こんにちは、テクニカルコンサルティングチームの三田です。
以前に、ASP.NET Core Razor Pages 関連の記事として、Hello World アプリケーションの作成やプロジェクトの構成をご紹介しました。今回は、ASP.NET Core Razor Pages に igGrid を組み込んでみます。
Ignite UI for jQuery の読み込み
Ignite UI for jQuery を読み込む手順を示します。
_Layout.cshtml に、Ignite UI for jQuery のスタイルファイルを読み込むための、RenderSectionAsync メソッドの呼び出しを加えます。このメソッド呼び出しにより、個別のページ(例えば Index.cshtml など)に @section Styles { ... } と記載することで、スタイルファイルをインポートすることができるようになります。下記コードスニペットの8行目をご覧ください。
_Layout.cshtml
<!DOCTYPE html>
<html lang="en">
<head>
    <meta charset="utf-8" />
    <meta name="viewport" content="width=device-width, initial-scale=1.0" />
    <title>@ViewData["Title"] - ASPNET_RazorPages_igGrid</title>
    <link rel="stylesheet" href="~/lib/bootstrap/dist/css/bootstrap.min.css" />
    <!--追加-->@await RenderSectionAsync("Styles", required: false)
    <link rel="stylesheet" href="~/css/site.css" />
</head>
<body>
    ...
    <script src="~/lib/jquery/dist/jquery.min.js"></script>
    <script src="~/lib/bootstrap/dist/js/bootstrap.bundle.min.js"></script>
    <script src="~/js/site.js" asp-append-version="true"></script>

    @await RenderSectionAsync("Scripts", required: false)
</body>
</html>
igGrid の初期化
igGrid にデータをバインドし、フィルタリング機能とページング機能を有効化します。Styles 及び Scripts セクションに、Ignite UI for jQuery 製品をインポートしています。これにより、igGrid を初期化するページにのみに、これらスタイルファイル・スクリプトファイルをインポートすることができます。
Index.cshtml
@page
@model IndexModel
@{
    ViewData["Title"] = "Home page";
}

<table id="grid"></table>

@section Styles{
    @*製品ファイルのインポート*@
    <link href="https://cdn-na.infragistics.com/igniteui/latest/css/themes/infragistics/infragistics.theme.css" rel="stylesheet">
    <link href="https://cdn-na.infragistics.com/igniteui/latest/css/structure/infragistics.css" rel="stylesheet">
}
@section Scripts{
    @*製品ファイルのインポート*@
    <script src="https://code.jquery.com/ui/1.10.3/jquery-ui.min.js"></script>
    <script src="https://cdn-na.infragistics.com/igniteui/latest/js/infragistics.core.js"></script>
    <script src="https://cdn-na.infragistics.com/igniteui/latest/js/infragistics.lob.js"></script>
    <script>
        $(function () {
            //バインドデータの準備、および、igGrid の初期化
            var northwindProducts = [
                { "ProductID": 1, "ProductName": "果汁100% オレンジ", "CategoryName": "飲料", "InStock": 39 },
                ...
                { "ProductID": 30, "ProductName": "いくら", "CategoryName": "魚介類", "InStock": 10 }
            ];

            $("#grid").igGrid({
                dataSource: northwindProducts,
                columns: [
                    { headerText: "製品 ID", key: "ProductID", dataType: "number", width: "25%" },
                    { headerText: "製品名", key: "ProductName", dataType: "string", width: "25%" },
                    { headerText: "カテゴリ", key: "CategoryName", dataType: "string", width: "25%" },
                    { headerText: "在庫数", key: "InStock", dataType: "number", width: "25%" }
                ],
                features: [

                    {
                        name: "Filtering",
                        type: "local"
                    },
                    {
                        name: "Paging",
                        pageSize: 10
                    }
                ]
            });
        });
    </script>
}
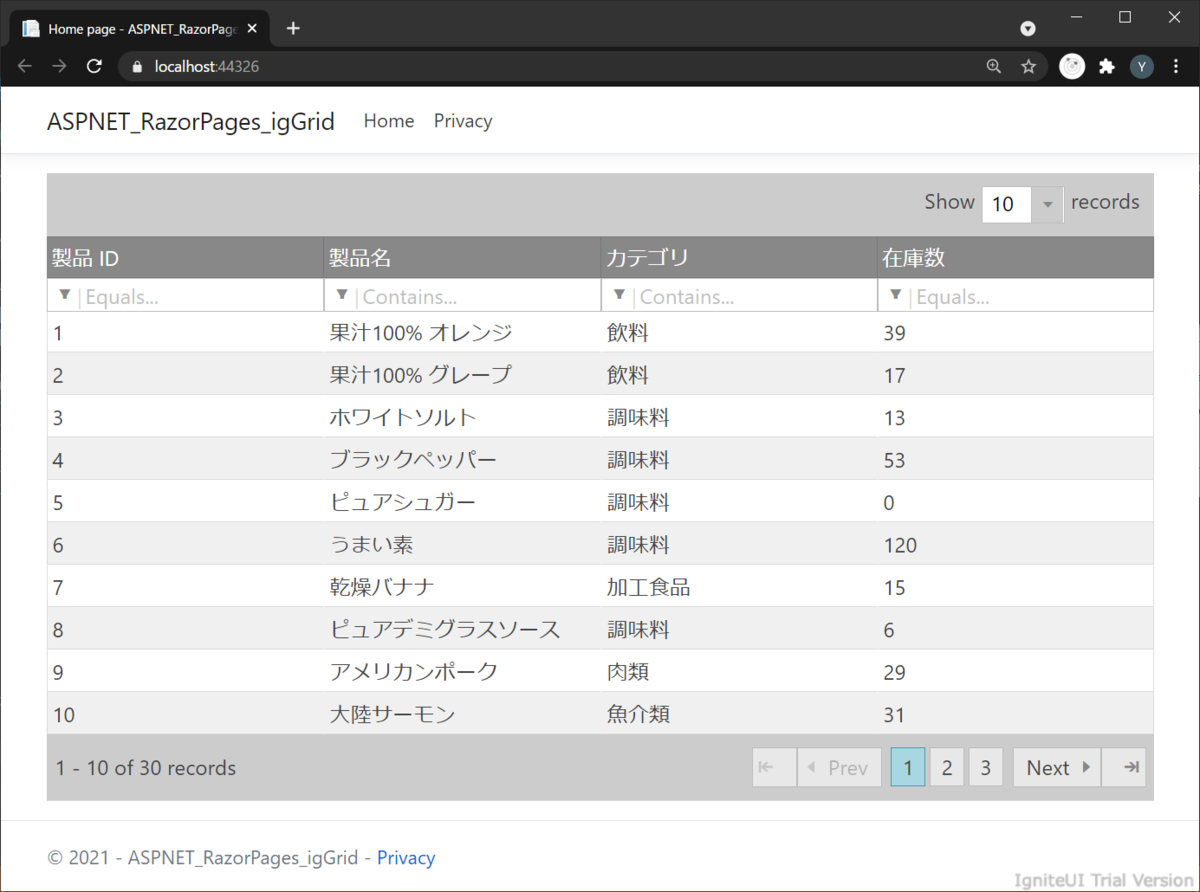
実行結果
ASP.NET Core Razor Pages で igGrid を利用することができました。

アプリケーションのダウンロード
今回実装したアプリケーションは下記ページよりダウンロードできます。
最後に
3 回にわたって、ASP.NET Core Razor Pages での Hello World、ファイルやフォルダの構成、Ignite UI for jQuery グリッドの表示までをご紹介しました。
この記事に関して何かご質問・ご不明な点がありましたら、お気兼ねなくインフラジスティックスまでお問い合わせください。

